Upload users by batch CSV file
Summary
Admins can run a batch upload from a Comma Separated Value (CSV) file. Create or invite new learners and update user data from CSVs.
Download an example template
- From main navigation go to Users.
- From the action menu select Batch Upload.
- Optionally: select a Separator character. The default separator is a comma.
- From Select your user data file, choose download an example file.
Safety Made Simple provides a download link to a CSV, which you can open in a spreadsheet.
Prepare your CSV file
The template file contains column titles like username, email, firstname and lastname. Do not change the column titles: the application needs these titles to recognize the data.
- Delete the sample data and replace it with your data.
- The template file contains a notes section about how to populate your file. Delete this text before uploading the file.
- After you enter your data in the CSV file, save it locally to ready for upload.
The following screenshot shows the top of the example template.
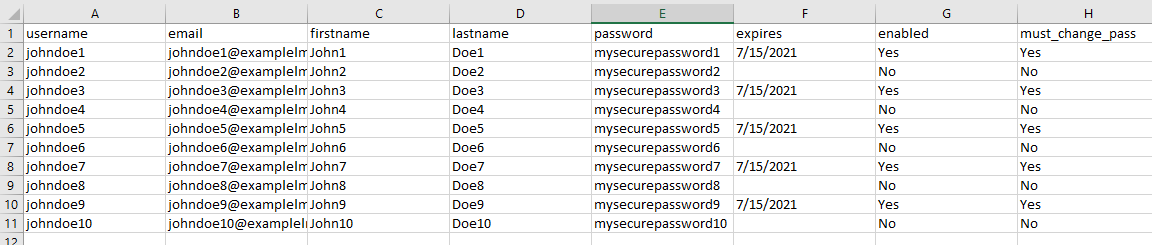
Required columns:
- username: the unique identifier for the portal
- password: when creating new users you must provide an initial password
When inviting users, delete the password column: new users set their own passwords when they accept the invite.
All other columns are optional, but you may need them for additional actions like assigning groups.
Though it is not mandatory, we highly recommend you always enter the firstname and lastname for your users.
 Username Tip: Usernames must be unique for each user in all of Safety Made Simple. Username lengths can be no less than six characters and no greater than 30 characters. Username Tip: Usernames are not case sensitive.Password Tip: The passwords in your file can be no less than 6 characters in length. Passwords are case sensitive.Password Tip: Passwords ARE case sensitive.
Review the example CSV, column by column.
Typically, the example CSV file contains the following columns. The columns can vary if you have set up custom user data fields. See “Custom user data: set up custom fields”.
- username: required as the unique identifier Safety Made Simple uses to distinguish users in all portals
- email: optional but we recommend entering one when possible
- firstname, lastname: are not mandatory but we highly recommend always entering this information
- password: required for creating users, delete the column if you are inviting users
- expires: optional. Set a date when the user's access to Safety Made Simple runs out. When a user's account expires, they get an error message when trying to log in.
- enabled: optional. By default, Safety Made Simple enables new users. Enter No to disable users: for instance, for someone on leave, to prevent them logging in when they are not at work.
- must_change_pass: an optional setting for creating users, where you are providing an initial password. Enter Yes to oblige the user to change the initial password at first login.
An admin can enable a user's login again from the user's profile. To enable a large number of accounts, use a batch upload with the enabled column set to Yes.
 Note: when a user's account expires, Safety Made Simple disables their login. This effect is the same as setting the enabled column to No.
CSV columns for features: assign_groups and group_sync
- assign_groups: this column's data assigns users to different groups, or multiple groups. The group name you enter must match the spelling and spacing of the group name in Safety Made Simple, or else the batch upload does not recognize it, and generates an error.
- You can only add users to groups with assign_groups: you cannot remove a user from a group with this column. To change or remove users from groups use group_sync.
- group_sync: this column works together with Perform user/group upload sync? option in the portal, to add and remove users from groups. Enter group names as comma-separated list, like for assign_groups.
- If group_sync has entries, the application ignores any entries in assign_groups.
 Warning: take care when updating existing users who are in groups. If you leave an empty value in group_sync, then the application removes those users from all their groups.
Upload your CSV file
For a basic task of creating new users you need the first 5 steps below. If you are using a batch upload to manage group assignments or courses, you set the additional optional settings.
- From main navigation go to Users.
- From the Actions menu, select Batch Upload.
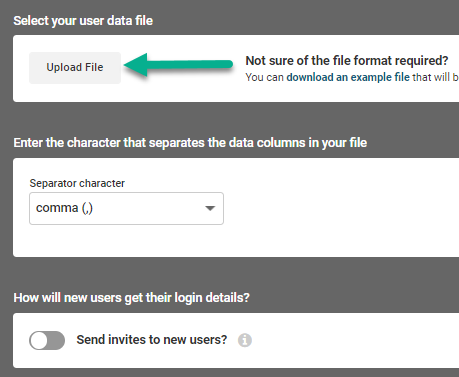
- Select Upload File. Find and then select the file you want to upload.
- From Enter the character that separates the data columns in your file, select the separator characters in your file: comma, tab or pipe. If you use the sample CSV file provided, use default commaseparator.
- If you are inviting users select Send invites to new users? Default setting is creating users.
- Select the optional settings which apply to this upload:
- To assign the whole batch upload to one or more groups, set Search and select groups to assign, and find the correct group names.
- If you are using the group_sync column in the CSV to add and remove users from groups, select Perform user/group upload sync.
- If you use group_sync to change users' groups, optionally select Perform unenrollments during user/group sync? to unenroll users from any courses when their group changes.
- To assign the whole batch upload to one or more courses, select Enroll users in courses? and search for the courses in the field as required.
- If you assign the batch to a course, you can optionally set Re-enroll completed users? so users stay enrolled on the course.
- Save to start the upload.
Note: in a single batch upload, you can either assign users to groups, or assign users to courses, through the interface options. You cannot set both options in a single batch upload.The following screenshot shows the 3 interface options used most often in a batch user upload.
A pop-up message confirms that Safety Made Simple is processing the file.
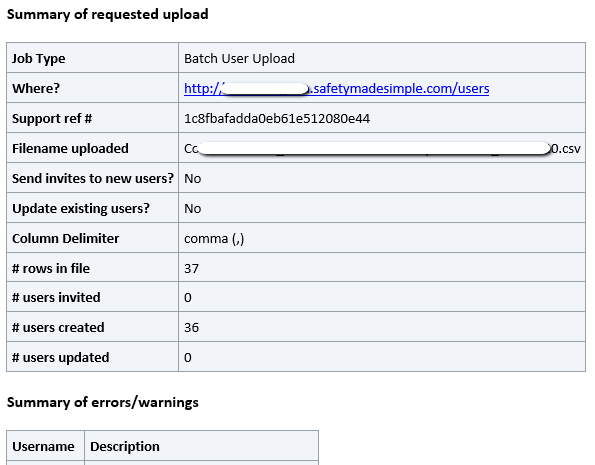
Batch summary email
The finished file upload triggers a summary email. The summary states if the upload was successful and lists the number of users who were created or invited. It lists errors if the file fails to upload, or if some accounts had errors.
Related Articles
Admins: Batch user upload: overview and options explained
Intended Audience: Administrators Summary Create, invite or update data for large numbers of users by uploading a CSV file: this article covers the feature, and its options in detail. The batch user upload feature is an effective tool for admins to ...Users: create an instructor, and assign them to a course
Intended Audience: Administrators , Instructors Instructors are users who lead courses Instructors also review and grade exams and assignments. Their user permissions let them work with learners, and access learners' assignments and exams, and mark ...Users: set and reset passwords
Intended Audience: Administrators, Managers Summary Create initial passwords for users, require a password change at first use, and reset passwords for users. These features apply to users, when you create them, or through their profiles. Access ...Download all user data in portal
Intended Audience: Admins, Managers Summary Download all your user settings and information, aka metadata, including custom user data, in comma-separated value (CSV) format. This download contains most of the data available from a user's profile. Use ...Group your users
Intended Audience: Administrators, Managers Summary Safety Made Simple lets you create groups, and assign users to groups, to manage training for large numbers of learners. Groups can represent departments, teams, work sites, or partners. Groups are ...