Manage custom email templates
Summary
Default email notifications
The following templates are available by default on your portal. You don't need to enable the templates. Safety Made Simple sends them to learners when you use a feature (like portal invites) or set the options at the course level.
- Portal Invites- requires sending portal invites to users
- Enrollments- sent by default. You can disable these at portal, or at course, level, if required
- Course Completions- requires setting up a course completion notification
- Course Recertifications- requires adding a certificate to a course, and setting auto re-enroll options
- Enrollment Reminders- requires setting up in course notifications
- Rejected Enrollment Request- requires allowing users to self-enroll, and enabling admins and managers to reject enrollments
When you use these features, or set the notification option, Safety Made Simple uses default wordings, as shown in the custom email templates.
Find custom email templates
From main navigation go to Settings > Email > Custom Email Templates.
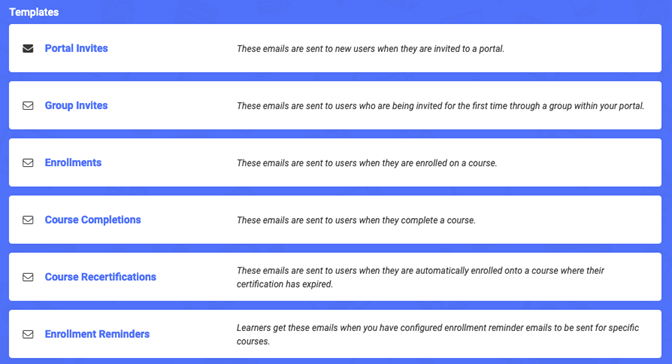
The page shows all the custom templates available.
The following screenshot shows a sample of templates with Portal Invites template enabled. When you enable a template the mail icon changes.
Enable and edit a custom email template
Safety Made Simple provides a sample default text and variables for each template as a starting point.
In this context, enabling a custom template means customizing the template, optionally adding more recipients, and selecting Enabled to choose this text over the default text.
- From main navigation go to Settings> Email > Custom Email Templates.
- Select a template to open it.
- Enter a Subject, and edit the text in Message using the CK editor.
- Add variables to Message and Subject by selecting a variable from the list provided.
- From the Actions menu, select Send to Self to receive a preview to your email address.
- When your template's content is correct, select Enabled? to start sending it to users.
- Optionally: for certain templates, select additional recipients for copies:
- Bcc Course Owner
- Bcc Managers
- Cc an email address of your choosing on all emails sent: enter an address
- Bcc an email address of your choosing on all emails sent: enter an address
- Save to finish.
To undo all changes to a template: from the Actions menu select Reset to Default.
Use cc and bcc in email templates
You can set up email templates to send copies of emails to people who aren't taking the course, including:
- bcc (blind courtesy copy) emails to course owners and group managers: learners can't see the names of bcc recipients
- cc (courtesy copy) and bcc emails to any other email addresses you provide: learners can see the names of cc recipients
These options are available for templates about enrollments, assignments, and learning paths, which typically apply to groups.
When you enable Bcc Managers on a template, all managers for the learners receiving the emails receive a copy.
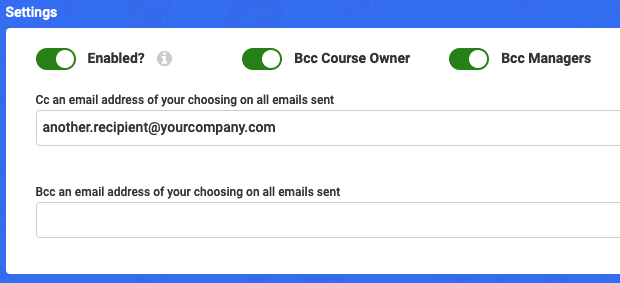
The following screenshot shows the email template for enrollments, with Bcc Course Owner and Bcc Managers enabled, and a sample cc email address.
 Note: newly-assigned managers can encounter temporary delays, the first time they are assigned as a bcc recipient. If the delays persist, contact the Support team.
Custom email template list and requirements
The following lists group templates by function, and includes the default templates. Some templates require settings for the relevant features.
Invite templates
- Portal Invites
- Group invites: requires at least one group created on your portal
See Course notifications: set automated messages for course events to learn how to set up most of these messages.
- Enrollments
- Course completions
- Course recertifications
- Enrollment reminders
- Exam completions: requires Send email to the learner's instructor when they submit this exam enabled in the exam options
- Course due date reminders: requires setting a due date on a published course, and enabling due date reminders in the course notification settings.
- Learning path enrollments: requires turning on Enable Learning Paths in the portal settings.
- Rejected enrollment request: for courses in the catalog where you require managers or admins to review and approve requests. If they reject a learner's request, Safety Made Simple sends this email message by default.
- Course overdue: requires setting a due date reminder on a published course
Assignment templates
Both these templates require your course to have an assignment module. The course can be in draft or published status.
- Assignments submitted by learner
- Assignments reviewed by instructor
Email templates and default languages
Email templates appear in the default language of the portal you use, when you open them for the first time.
Example: If you create a portal and set the language to French, then open any email templates, the template text appears in French.
If you change the portal language to English, any templates you opened, even if you didn't enable them to use, remain in French.
Reset email templates to current portal language
You can reset email templates one by one to the current portal language by returning them to their default versions.
 Tip: if you've added custom text to a template, copy and paste your custom wording to a text editor, so you can recreate it in the current portal language.
To reset an email template's language:
- From main navigation go to Settings > Email > Custom Email Templates.
- Select the template you need to change to open it.
- From the action menu, select Reset to Default.
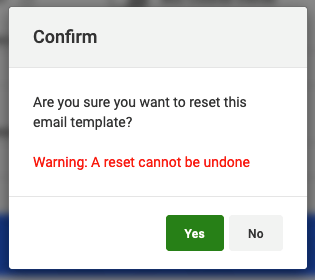
- In the dialog that opens select Yes to confirm.
The following screenshot shows the reset confirmation dialog.
A pop-up message confirms that Safety Made Simple has reset your template to its default version.
Related Articles
Add images from the library to your custom email templates
Intended Audience: Administrators Summary Add brand images to your custom emails to users: upload images, and resize them using HTML. This 2-step method requires: uploading an image to your Library makes the image available across the portal and ...Email: set up SMTP to connect to a custom email server
INTENDED AUDIENCE: Admins Summary Set up SMTP to send portal notifications through an email service like Amazon SES, Sendgrid, or other similar provider. Contact your Customer Support Manager to consider if SMTP to a custom email server to help your ...Messages and email: set options for the portal
Intended Audience: Administrators Summary Set the options for messages sent within your portal. Messages keep learners, managers and instructors up to date about courses, assignments and enrollments. Messages include: automated notifications messages ...Create and edit banner images for email notifications
Intended Audience: Administrators Summary Upload up to 10 banner images per portal, to add your brand to your automated messages, and to custom email templates. You can assign different banners for different courses. When Safety Made Simple sends ...Email deliverability: best practices to avoid email bounces
Intended Audience: Administrators Summary If your portal's automated email messages cause too many hard bounces, Safety Made Simple disables your outbound mail, until you can resolve the problem email addresses. About Safety Made Simple email Safety ...