Group your users
Intended Audience: Administrators, Managers
Summary
Safety Made Simple lets you create groups, and
assign users to groups, to manage training for large numbers of learners.
Groups can represent departments, teams, work sites, or partners.
Groups are an effective way to
organize your learners, to:
· assign training for sets
of learners
· report on training for
compliance requirements
Groups can represent
departments, teams, work sites or similar.
Groups act as containers for
holding learners. If you delete a group, you do not delete the
accounts within it: you delete only the container which held the learners
together.
 Tip: If your organization users dynamic rules to assign
large numbers of learners to groups, best practice is to create groups and
enroll those groups on courses first. You can assign courses to groups which
have no learners in them. Add learners to groups using dynamic rules as a
second step.
Tip: If your organization users dynamic rules to assign
large numbers of learners to groups, best practice is to create groups and
enroll those groups on courses first. You can assign courses to groups which
have no learners in them. Add learners to groups using dynamic rules as a
second step.Create a group
To create a new group on your portal:
- From main navigation go to Groups.
- From the Groups page, in the Actions Menu > Add group.
- Enter a name and a description.
- Save to finish.
 Note: If you sue SAML integration to synchronize the groups between your portal and
the IdP, enabling Sync group with SAML SSO lets you automatically add or remove
users from the group. You need to set up the SAML integration before the option
appears on your page.
Note: If you sue SAML integration to synchronize the groups between your portal and
the IdP, enabling Sync group with SAML SSO lets you automatically add or remove
users from the group. You need to set up the SAML integration before the option
appears on your page. Add users to a group
These instructions explain how to add individual users to a group. If you already have groups in place, you can add as many users as required to groups using a batch user upload.
- From main navigation, go to Groups > your group.
- From the group page, select the Users tab on the secondary navigation menu.
- From the action menu, select Add User.
- Enter a User name or email in the search field, or scroll to view names, to select your user.
- Select Add to Group.
Invite users to a group
Inviting users sends the user an email invitation, which requires their response. Until they respond, they are a pending user.
- From main navigation, go to Groups > your group.
- From the group page, select the Users tab on the secondary navigation menu.
- From the Action menu, select Invite Users.
- Enter the user email addresses and select Invite.
Delete a group
To delete a group on your portal:
- From main navigation go to Groups.
- From the Groups page, locate the card of the group you are deleting, select More > Delete. “More” is what the three dots are referred to which do not show up until you hover over your group card.
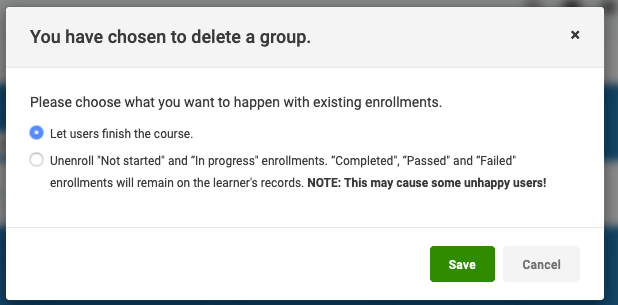
- In the confirmation dialog, indicate how you want Safety Made Simple to handle any learners in the group who are on a course:
- Let users finish the course
- Unenroll "Not started" and “In progress" enrollments. “Completed", “Passed" and “Failed" enrollments will remain on the learner's records
- Save to finish.
The following screenshot shows the More > Delete option for a sample group called Test Group.

The following screenshot shows the confirmation dialog, for choosing how to handle learners in the group after deletion.
 Note: This dialog appears for any Delete Group action, even if the group is empty.