Admins: Dynamic rules: use custom user data or email domain to assign users to groups
Summary
Dynamic rules can both add and remove users based on changes in their data.
Creating and running a rule means the application runs new conditions on your existing group members, and also on all non-group members: initially, this change takes a few minutes.
Create a dynamic rule based on email domain, account creation date or custom data
Dynamic rules can both add and remove users based on changes in their data.
By default, if a dynamic rule removes users from the group, the rules also unenroll them from any group courses. You can keep users enrolled in group courses, if required.
When you create a rule, you can Save as draft before running it. Your rule requires at least 1 condition as a criteria before you can save it.
- From your group go to secondary navigation Users.
- From Dynamic Rules select Build rules.
- From Build the rule for the group with, select one of:
- All users in this portal
- Users from another group > choose the group name
- Select Add conditions.
- From Select field, choose one of:
- email domain: no @ symbol, text and dot only, example: mycompany.com
- user creation date: the date an admin creates an account, or the date a user signs up
- one of your custom user data fields
- In Define filter type, select an operator: the field type determines your options.
- In Add value, select a dropdown value, or enter free text values, as required.
- Select Add row to add more filters: these rows work together with each other.
- Select Add alternative conditions to add 1 or more filters to work separately from the first row.
- Optionally: when the rule is ready, select Preview to show you how many users match the criteria.
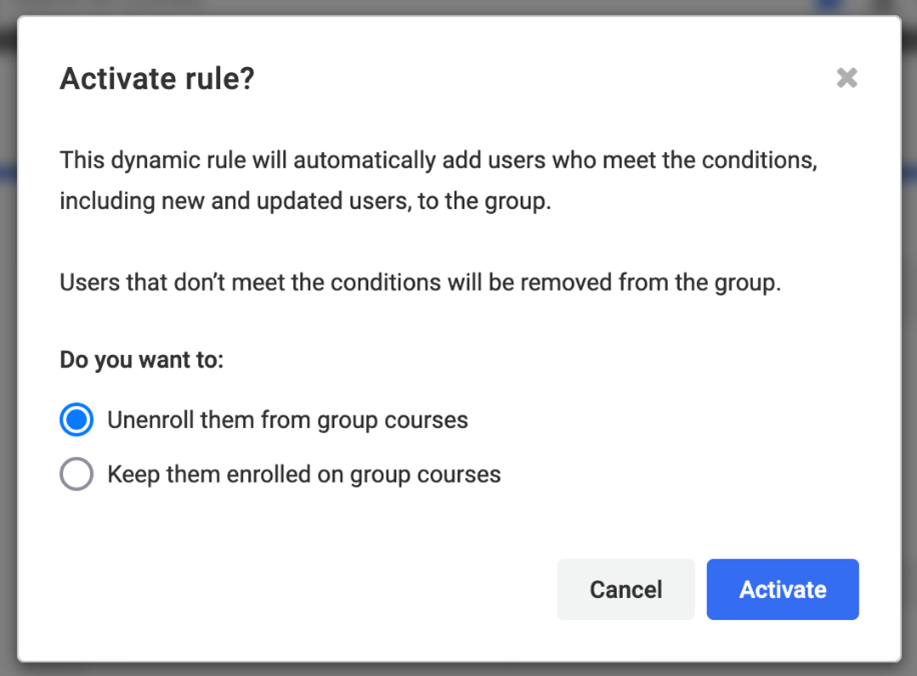
- Select Run rule. A dialog opens to confirm how to handle any users who the rule removes from the group. The default setting is to unenroll users from group courses: you can change this as required.
- Select Activate to start the rule.
The following screenshot shows the confirmation dialog with its default setting.
Worked examples of using criteria to create rules
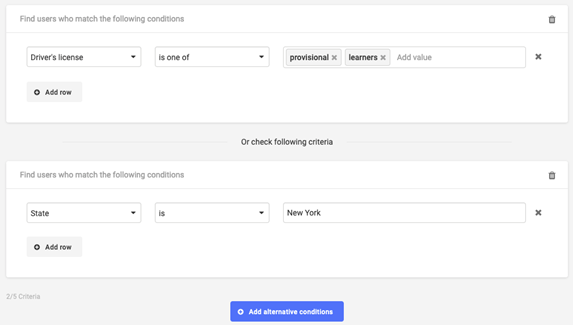
Example 1: "one of" OR "is"
The following screenshot shows an example rule:
- All users (not shown)
- Driver's license is one of learners, provisional: dropdown values from the user data field
OR
- State is New York, entered as free text
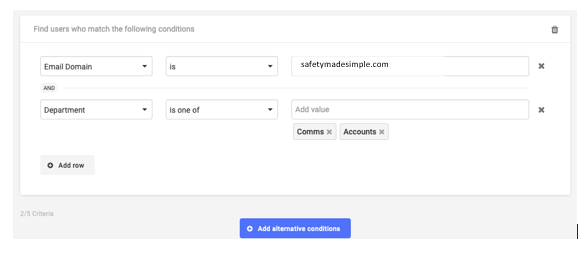
Example 2: email domain AND "one of"
The following screenshot shows an example rule:
- All users (not shown)
- Email domain is com, without the @ symbol
- Department is one of Comms, Accounts: free text values, selecting Enter after each value
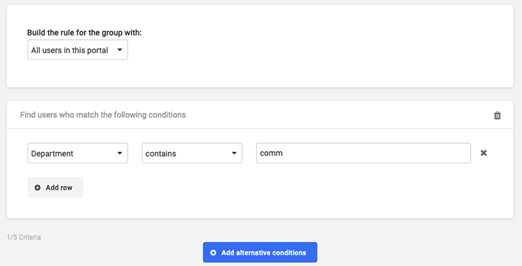
Example 3: all users and custom user data field "contains" text
The following screenshot shows an example rule:
- All users
- Department contains comm: free text, whole or partial words - to find both Comms and Communications in department titles
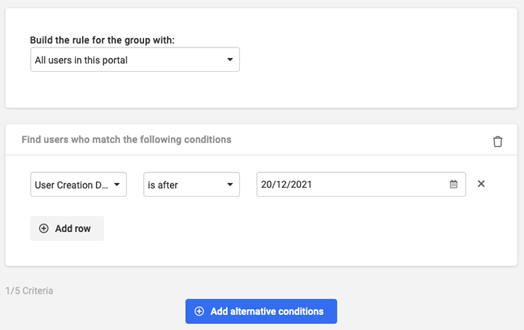
Example 4: all users and User Creation Date is after a calendar date
The following screenshot shows an example rule:
- All users
- User Creation Date is after 20/12/2021, a date chosen from the calendar
Create a rule to add all users to one group
An "all users" group which includes everyone in your organization doesn't need data or conditions. You do need to create the group for all users to join.
Tip: You can at any point select Save as draft to save a rule in process, or select Preview, to see how many users the rule affects.
- From your group go to secondary navigation Users.
- From Dynamic Rules select Build rules.
- From Build the rule for the group with, select All users in this portal.
- Optional: select Preview to check how many users appear in the group.
- Select one of:
- Run rule: after confirmation, starts the rule
- From the action menu, Save as draft: the rule is ready to run when you need it
Change a dynamic rule
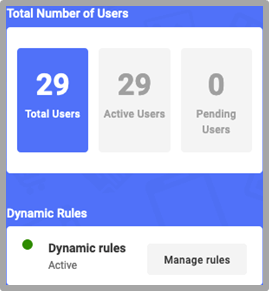
When a rule is active, the Dynamic Rules feature appears as Active on your group > Users page.
The following screenshot shows an active rule with the Manage rules option available.
You can edit the rule further if required, including:
- add and change the criteria applied to users
- change what happens when you remove a user from a group - by default, Safety Made Simple unenrolls users from group courses if the dynamic rule removes them from a group
To change an existing rule which is running:
- From your group >Users, select Manage rules.
- From the Dynamic rules page, edit the conditions you set for the rule.
- From the action menu select Enrollment options to review or confirm the default unenrollment from group courses.
- Optionally, Preview the changes to see how many users the change affects.
- Select Update running rule and confirm, to apply these changes.
Changing a rule means the application needs to synchronize: it runs the new conditions on your existing group members and also on all non-group members. This synchronization can take a few minutes.
You can't edit a rule while it's synchronizing.
Preview a rule
You can preview a rule before running it. A preview:
- shows the number of users who match the criteria
- lets you download a CSV copy of those users, as a reference
If the preview numbers and users are significantly different from the expected user numbers, review the rule to confirm that the criteria are correct.
- From your group >Users, select Manage rules.
- From the Dynamic rules page, edit the conditions you set for the rule.
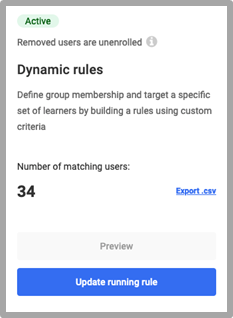
- From the Dynamic rules panel, select Preview, to see the number of matching users, and a link to csv.
- Optional: select csv to generate a list of those users for download.
Safety Made Simple provides a temporary link to download the CSV.
The following screenshot shows a sample of the Dynamic rules panel.
Deactivate a rule
To stop a rule from running on a group:
- From your group > Users, select Manage rules.
- From the Dynamic rules page, select Deactivate rule and confirm your action.
On your group > Users page, the Dynamic rules feature appears as Not active.
Assigning users to groups automatically vs manually
When you use dynamic rules to add users to groups, the application shows them as assigned Automatically.
You can always add users to groups by assigning them to a group individually. You can also add them to groups in batches.
The application shows individual and batch-uploaded assignments to groups as assigned Manually.
This distinction is important: if you add users to a group manually, they remain in the group, even if they do not meet the dynamic rules for the group.
The manual option provides an override, so you can place particular users in a group even if their custom user data doesn't match the group.
A user added manually to one group is still subject to dynamic rules for other groups.
Related Articles
Admins: Dynamic rules: overview
Intended Audience: Administrators Automate the routine work of sorting learners Assign your users into groups based on email domain, date created or custom user data, as soon as you create them in Safety Made Simple. Combine dynamic rules with ...Admins: Custom user data and dynamic rules: editing options
Intended Audience: Administrators Summary Learn what parts of custom user data you can change while dynamic rules are active. As background for editing custom user data, see: Custom user data: set up custom fields with details about field types ...Admins: Custom user data: setup custom fields
Intended Audience: Administrators Summary Custom user data fields let you record additional user information in users' profiles. Custom user data fields in Safety Made Simple: Provide criteria for filtering learners into groups for automated ...Admins: Batch user upload: overview and options explained
Intended Audience: Administrators Summary Create, invite or update data for large numbers of users by uploading a CSV file: this article covers the feature, and its options in detail. The batch user upload feature is an effective tool for admins to ...Admins: User types and permissions: overview
Intended Audience: Administrators Learn the four broad user types and their permissions within Safety Made Simple. User types define what features users can access. You set the user type when you create or invite users. The 4 user types are: ...